
This guide walks you through two important setup steps to ensure your gateway maintains a reliable internet connection:
Step 1 Set a Static IP Address | Step 2 Enable the Connection Watchdog & Daily Reboot |
Prevents the gateway losing its IP address after a brief internet outage. | Automatically detects internet loss and bounces the network interface. A daily 3am reboot provides a belt-and-braces backup. |
Step 3 Set the Correct Timezone | Step 4 Enable the Hardware Watchdog |
Ensures the 3am daily reboot fires at the correct local time for your region. | Hardware-level protection — forces a reboot even if the OS is completely frozen, beyond the reach of software watchdogs. |
Step 1 — Set a Static IP Address
By default the gateway uses DHCP, meaning your router assigns it an IP address automatically. After an internet drop this process can fail silently. Setting a static IP removes this risk.
1.1 Access the Gateway Web Interface
1. Open a web browser on a device connected to the same network as your gateway.
2. Enter the gateway's current IP address in the address bar. If you are unsure, check your router's connected device list. The factory default is 10.130.1.1.
3. Log in with: username: root / password: dragino (unless you have changed these).
1.2 Navigate to Network Settings and Set Static IP
1. From the top menu click Network.
2. Select Network from the dropdown.
3. Change Protocol from DHCP client to Static address.
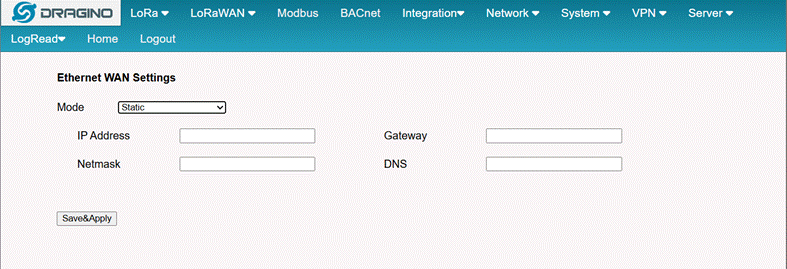
4. Enter the following details (ask your IT person or check your router if unsure):
• IP Address — e.g. 192.168.1.100 (pick a free address outside your router's DHCP range)
• Netmask — typically 255.255.255.0
• Gateway — your router's IP, e.g. 192.168.1.1
• DNS Server — enter 8.8.8.8
5. Click Save & Apply.
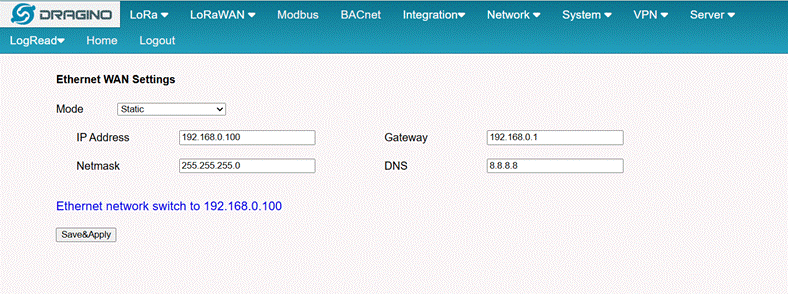
TIP: Write down the static IP address you assign. You will need it every time you log in to the gateway. |
Step 2 — Enable the Connection Watchdog
The watchdog runs a check every 5 minutes. If the internet connection is down, it automatically restarts the network interface — no manual reboot needed.
This is done by typing two short commands into a terminal window. No extra software needs to be installed — both Windows 10/11 and Mac have a built-in terminal.
2.1 Open a Terminal Window
? Windows 10 / 11 | ? Mac (macOS) |
1. Press the Windows key + R on your keyboard. 2. Type cmd and press Enter. 3. A black Command Prompt window will open. No downloads or installs needed — this is built into Windows 10 and 11. | 1. Click the magnifying glass (Spotlight) in the top-right corner of your screen. 2. Type Terminal and press Enter. 3. A white or black Terminal window will open. No downloads or installs needed — Terminal is built into every Mac. |
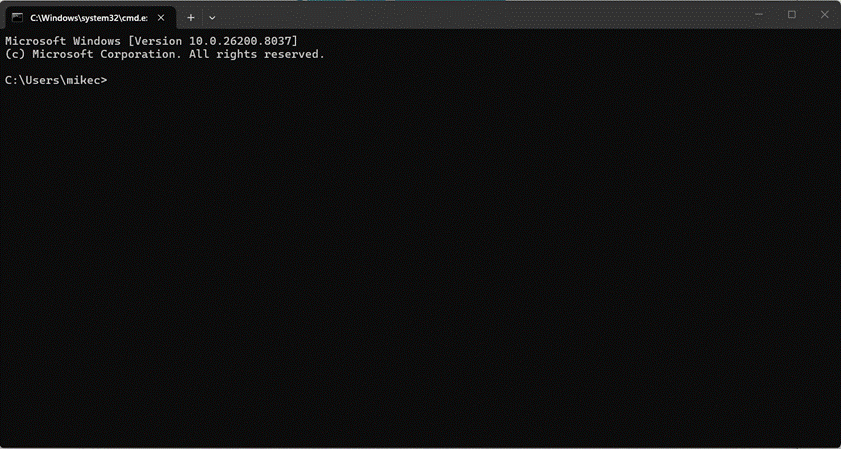
2.2 Connect to the Gateway via SSH
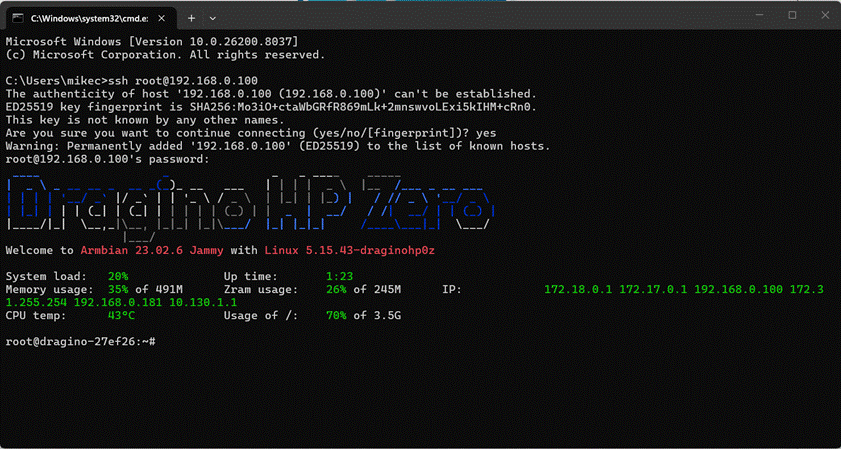
In the terminal window, type the following command and press Enter. Replace the IP address with your gateway's IP (the static IP you set in Step 1):
ssh root@192.168.1.100 |
When asked:
• Are you sure you want to continue connecting? — type yes and press Enter
• Password: — type dragino and press Enter (nothing will appear as you type — this is normal)
You are connected when you see a line ending in # like this:
root@dragino-xxxxxx:~# |
2.3 Add the Watchdog Job
Copy and paste the line below exactly, then press Enter:
(crontab -l 2>/dev/null; echo '*/5 * * * * ping -c 3 -I eth0 8.8.8.8 || (ip link set eth0 down && sleep 5 && ip link set eth0 up)') | crontab - |
2.4 Add the Daily Reboot Job
Copy and paste this command exactly, then press Enter:
(crontab -l 2>/dev/null; echo '0 3 * * * reboot') | crontab - |
2.5 Verify Both Jobs Are Active
Run this to confirm both lines are saved:
crontab -l |
You should see the watchdog jobs printed back on screen. You can then close the terminal window — the watchdog is now active and will survive gateway reboots.

TIP: If you only see one line, or neither line, re-run the commands in steps 2.3 and 2.4. Make sure you copy the full command including all brackets and quote marks. |
Step 3 — Set the Correct Timezone
Cron (the scheduler that runs the watchdog and daily reboot) uses the gateway's system timezone. If the timezone is wrong, the 3am reboot will fire at the wrong local time. This step ensures it is set correctly for your region.
3.1 Check the Current Timezone
While still connected via SSH (or reconnect using the steps in 2.1 and 2.2), run:
timedatectl |
Look for the Time zone line in the output. If it does not match your region, set it using the correct command from the table below.
3.2 Set Your Timezone
Find your region in the table below and run the corresponding command:
Region | State / Area | Command to run |
New Zealand | Main Islands (Auckland, Wellington, Christchurch) | timedatectl set-timezone Pacific/Auckland |
| Chatham Islands | timedatectl set-timezone Pacific/Chatham |
Australia | NSW, VIC, ACT, TAS (Sydney, Melbourne) | timedatectl set-timezone Australia/Sydney |
| QLD (Brisbane) — no daylight saving | timedatectl set-timezone Australia/Brisbane |
| SA (Adelaide) | timedatectl set-timezone Australia/Adelaide |
| WA (Perth) | timedatectl set-timezone Australia/Perth |
| NT (Darwin) — no daylight saving | timedatectl set-timezone Australia/Darwin |
| TAS (Hobart) | timedatectl set-timezone Australia/Hobart |
USA | Eastern Time (New York, Florida, Georgia) | timedatectl set-timezone America/New_York |
| Central Time (Chicago, Texas, Illinois) | timedatectl set-timezone America/Chicago |
| Mountain Time (Denver, Colorado, Utah) | timedatectl set-timezone America/Denver |
| Mountain Time — no DST (Arizona) | timedatectl set-timezone America/Phoenix |
| Pacific Time (Los Angeles, California, Washington) | timedatectl set-timezone America/Los_Angeles |
| Alaska | timedatectl set-timezone America/Anchorage |
| Hawaii — no DST | timedatectl set-timezone America/Honolulu |
TIP: After running the set-timezone command, run timedatectl again to confirm the timezone updated correctly. The 3am daily reboot will now fire at 3am in your local timezone. |
Step 4 — Enable the Hardware Watchdog
The software watchdog in Step 2 works well for ordinary network drops. However if the gateway's operating system freezes completely — which can happen due to memory exhaustion from the built-in ChirpStack server — cron stops running and the software watchdog cannot fire.
The LPS8v2 has a hardware watchdog chip that operates independently of the operating system. Even if the OS is completely frozen, the hardware watchdog will force a reboot. This is the most reliable safety net available.
4.1 Install the Watchdog Package
While connected via SSH, run this command to install the watchdog software:
apt update && apt install watchdog -y |
This will take about 30–60 seconds. You will see text scrolling — this is normal. Wait until you see the prompt (root@dragino...) return before continuing.
4.2 Enable and Start the Watchdog Service
Run these two commands one at a time:
systemctl enable watchdog |
systemctl start watchdog |
4.3 Edit the Watchdog Configuration File
The configuration file needs to be updated to point to the correct hardware device and set memory limits. This is done using a basic text editor called nano that is built into the gateway.
Open the file by running:
nano /etc/watchdog.conf |
The file will open in the terminal window. It will look like a page of text with many lines — most starting with a # symbol, which means they are turned off (commented out).
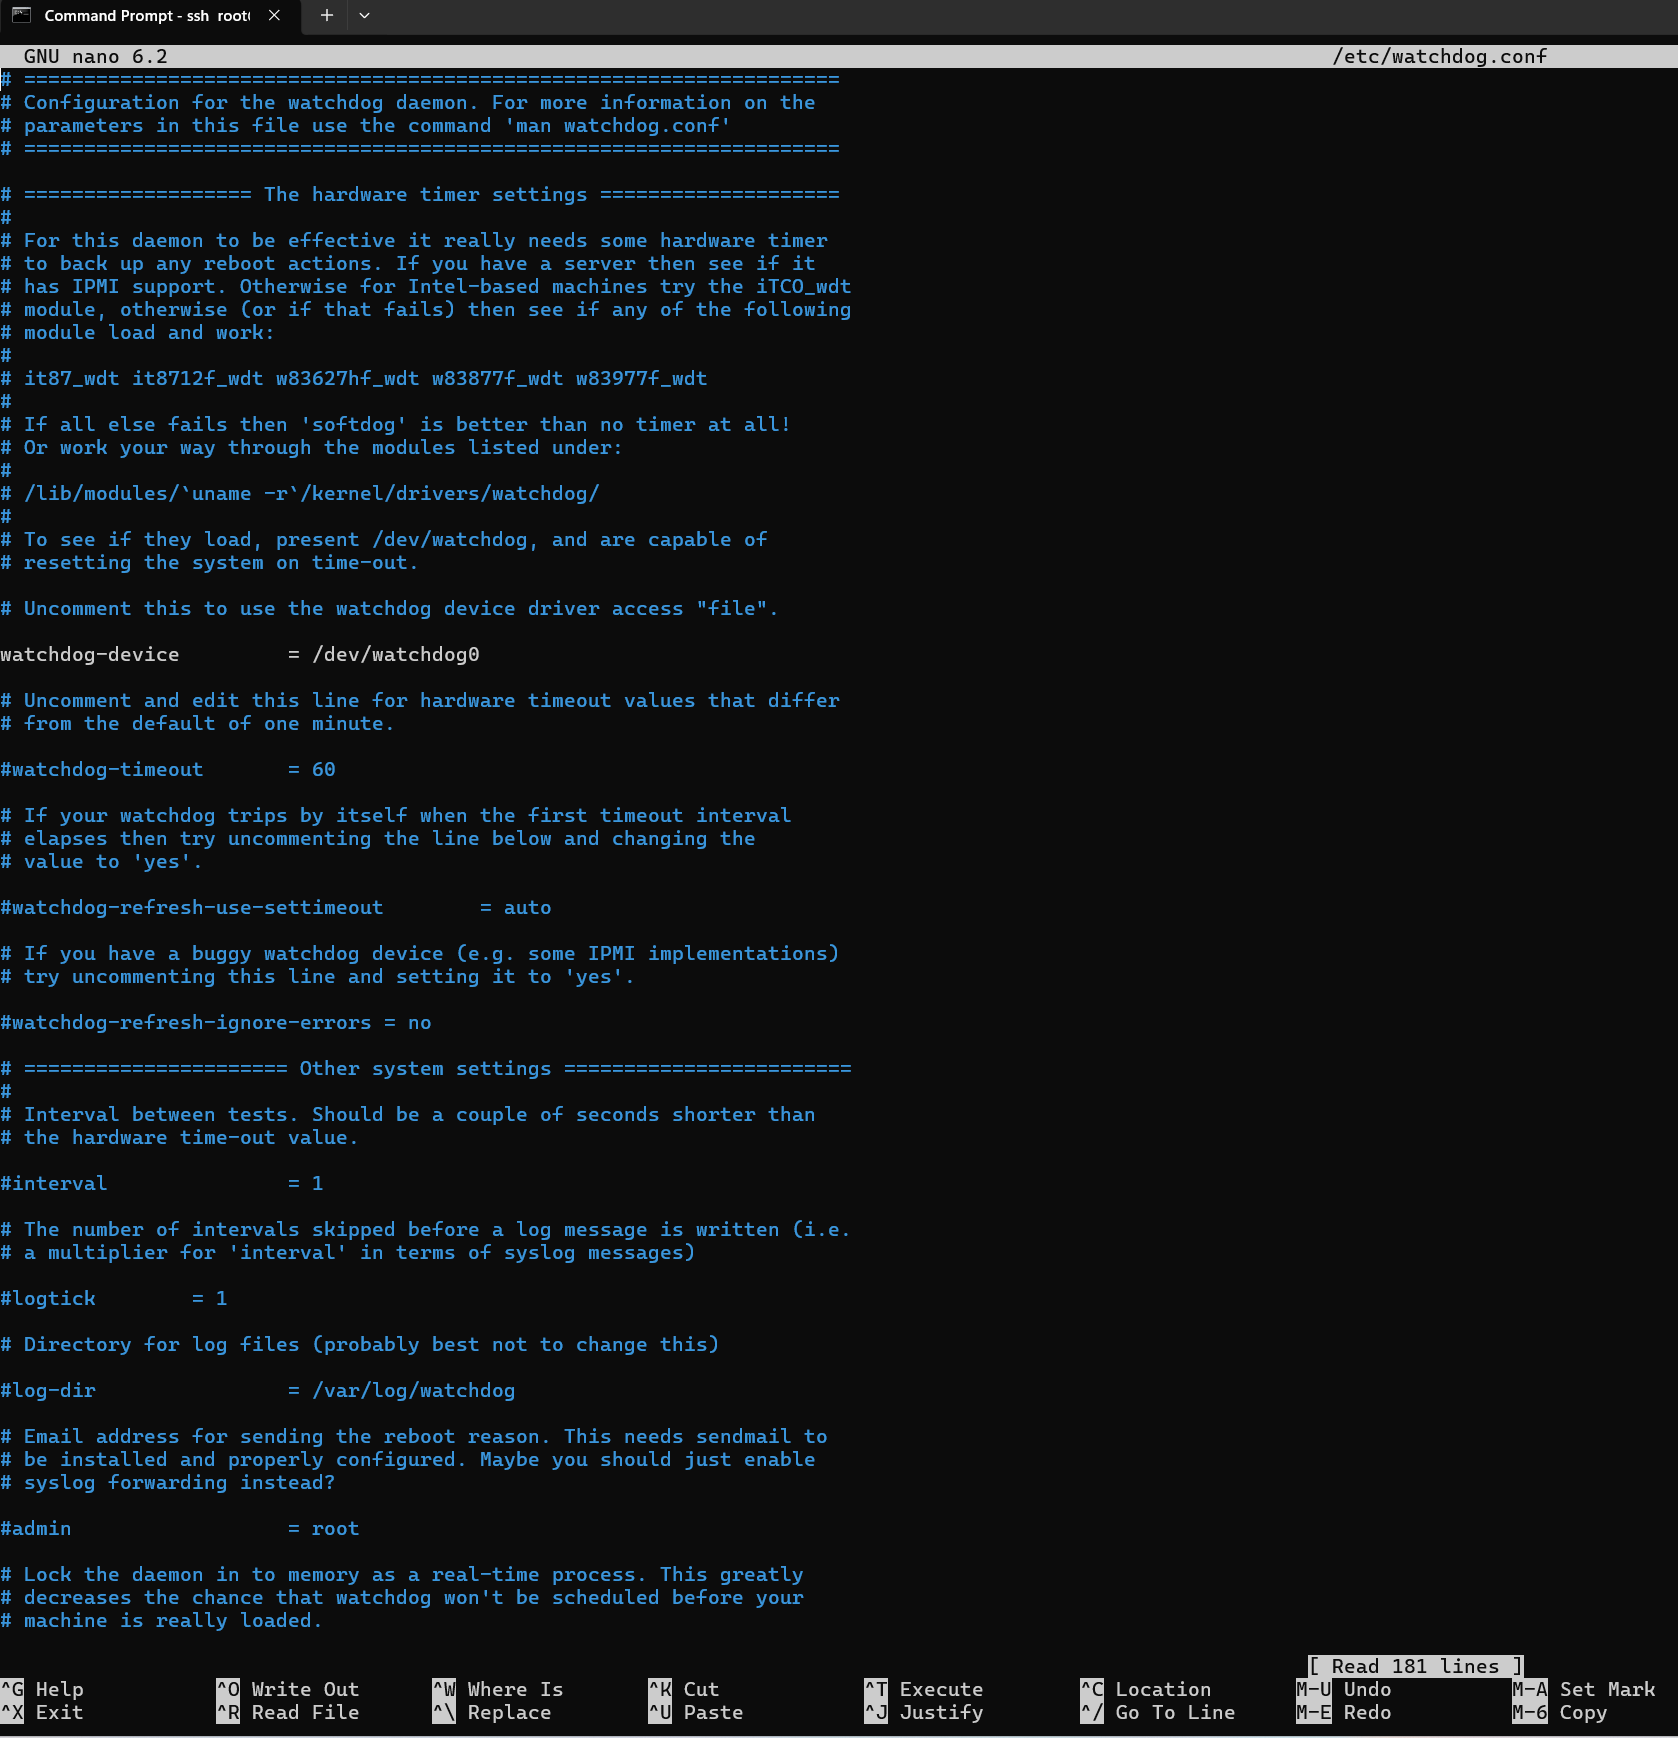
How to navigate in nano: • Use the arrow keys on your keyboard to move up and down through the file • To find a line quickly, press Ctrl + W, type the text you are looking for, then press Enter • To edit a line, move the cursor to it and use Backspace to delete and type to add text • Do not press Enter in the middle of a line — it will break the file |
Make the following three changes to the file. For each one, use Ctrl+W to search for the line, then edit it:
1 | Search for: watchdog-device Find the line that says #watchdog-device and change it to: watchdog-device = /dev/watchdog0 Make sure the # at the start is removed. |
2 | Search for: max-load-1 Find the line and change it to: max-load-1 = 24 This triggers a reboot if the system is critically overloaded for 1 minute. |
3 | Search for: min-memory Find the line and change it to: min-memory = 50 This triggers a reboot if free memory drops below 50MB, protecting against ChirpStack memory exhaustion. |
Once all three changes are made, save and exit nano:
Press Ctrl + X | Starts the exit process. A message will appear at the bottom asking if you want to save. |
Press Y | Confirms you want to save changes. |
Press Enter | Keeps the filename the same and saves. You will return to the normal prompt. |
4.4 Restart and Verify the Watchdog
Apply the configuration changes:
systemctl restart watchdog |
Confirm it is running correctly:
systemctl status watchdog |
You should see active (running) in the output, with no errors about 'Device or resource busy'. The hardware watchdog is now enabled and will survive reboots automatically.

TIP: If you see 'Device or resource busy' in the status output, the config may still be pointing to /dev/watchdog — make sure step 4.3 change 1 is set to /dev/watchdog0 (with a zero at the end). |
Verification
After completing all four steps, confirm everything is working:
✔ | Your sensor devices are reporting data to your application as expected. |
✔ | The crontab -l command shows both the watchdog and reboot lines. |
✔ | systemctl status watchdog shows active (running). |
✔ | timedatectl shows the correct local timezone. |
✔ | The gateway home page internet status icon is active — if it's not check your static IP address and gateway are correct. |