
A product may either be a finished good (FG) or a work in progress (WIP). WIP products are consumed into other products, either finished goods or other WIP products. QTRACA handles traceability from the raw material all the way through to the finished product.
The product setup is complex as it brings together the recipe, packaging, and unit of measure conversions for the finished product.
To setup a finished good product perform the following steps:
- Go to Setup ---> Products
- Click the button 'New Product'
- On each tab perform the following setup. The detail tab must filled in and saved before you can move to the other tabs.

Detail
The detail tab holds the base information for the product.
- Enter a unique code to identify the product, and a description
- Select the product type as FG - Finished Good
- Select whether the product is active or not. If product is not active it will not be selectable when creating a new batch.
- Enter the stocking unit of measure for the finished good. Inventory transactions will be recorded in this unit
- If a FG product, specify the default unit of measure for dispatch. If left blank a dispatch will default to the stocking unit of measure.
- Enter a unit cost for reporting purposes
- If a WIP product, then you can enter substitute WIP product to use if this WIP is not available. (See assigning batch ingredients for more detail)
- If a WIP product, determine whether the product is allowed a variable quantity when entering quantity on a batch. If it is not variable then the quantity on the recipe must be entered on the batch
- Enter the shelf life of the product (optional). If entered then the best before/ used by date will default to the manufactured date + the shelf life days
- The best before date, or used by date can be entered on the production batch. Check which one you want to be entered during production
- If you like to collect the e-cert or temperature on dispatch of this product then check the fields required for this product
- If you would like to sort your dispatch lines you may do so by entering a pack sort order. This should be an integer value used to sort your dispatch lines by product.
- Save the product detail
Recipe
The recipe defines what ingredients (raw materials, WIP) are consumed to make this product.
Recipes may change over time and therefore in QTRACA they are versioned controlled. This maintains integrity in batches previously produced whilst allowing new batches to use the modified recipe.
Every time a recipe changes a new version should be created by cloning the previous version and then making the required changes.
To create a new recipe perform the following steps:
- Go to the recipe tab
- Click the Add Version button, a new draft version will be created

- Define the base quantity the recipe will make, and provide the unit of measure that this quantity is in. Note, that the quantity doesn't have to match the quantity produced in a production batch. When adding a batch you can add a multiplier to increase or decrease the base quantity of this recipe
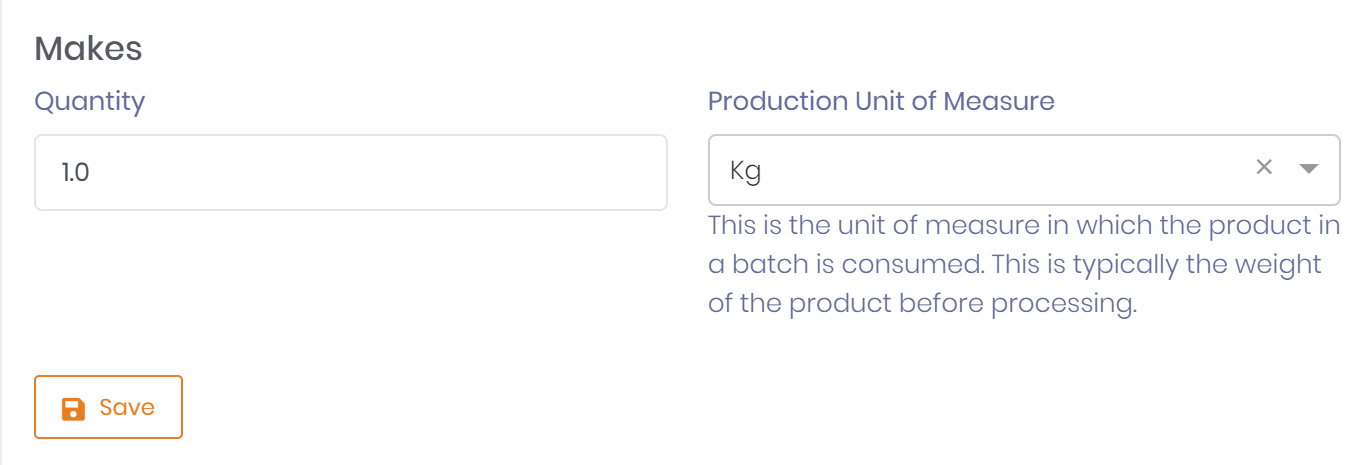
- Click Save to save the base quantity and unit of measure
- Add any overhead costs to the recipe if you want to capture total cost for making recipe. Overhead costs can be defined in Dynamic Lists.
- Add the ingredients to the recipe
- Specify the product, quantity, and unit of measure for the ingredient
- Click Save
- You can edit or delete an ingredient once added by clicking the edit or delete button
- Add any notes to the recipe.
- A rich note can be added anywhere in the recipe and will displayed inline in the recipe when viewed or only when you select the note when viewing the recipe.
- After adding note click Save
- You can edit or delete an ingredient once added by clicking the edit or delete button
- Once all your ingredients and notes have been entered you can publish the recipe so that it can be used
- If you made a mistake and the version is not published you can delete it by clicking the delete button
- If you have published a recipe but it has not yet been used you can unpublish it by clicking the unpublish button

- If you want to create a new version based off another version then you can clone the version by pressing the clone button
Substitute Ingredients
For each ingredient entered in the recipe you may also setup substitute ingredients. These substitute ingredients should have the same UOM base and same specifications as the main ingredient.
- Expand the Substitute Ingredients section for the ingredient you wish to substitute.
- Click on 'Add Substitute Ingredient'.
- Enter ingredient and save. Note: Only active ingredients can be selected.
- Repeat for other substitutions.
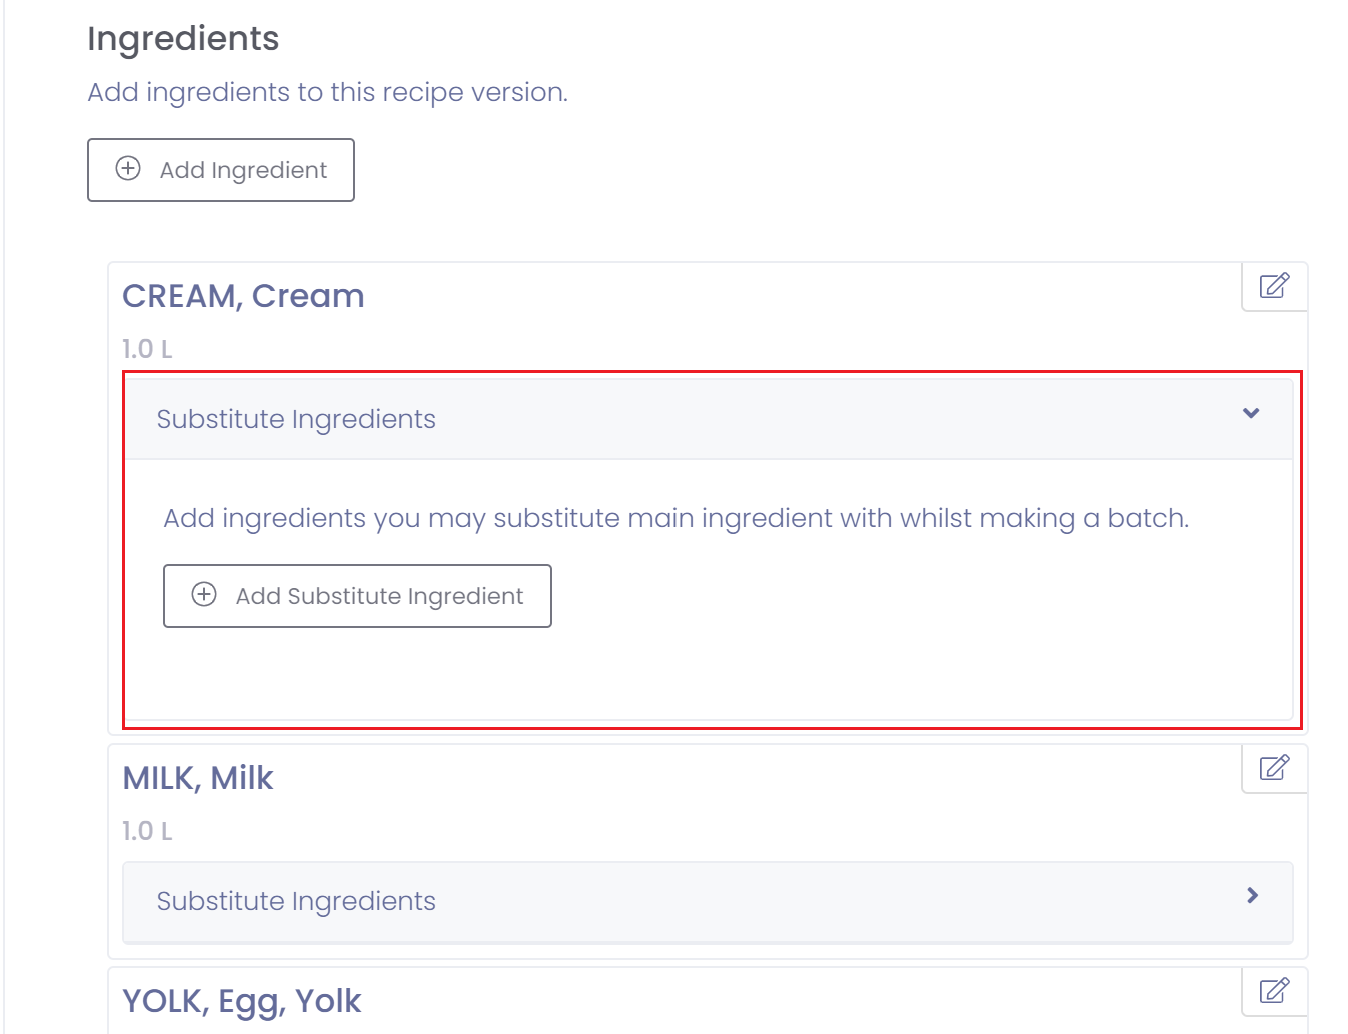
When entering a batch you will be able to replace the main ingredient with one of the substitutions.
Recipe Costing
You can calculate the cost of a recipe automatically by turning on the 'Calculate Recipe Cost' flag in settings.
Calculate Recipe Cost To calculate the recipe cost turn on the 'Calculate Recipe Cost' flag on in Setup --> Account Settings. |
Once this flag is switched on the cost will be calculated from each ingredient and rolled up along with any cost overheads for the recipe.
Overhead types can be added through dynamic lists (Setup --> Dynamic Lists). A cost may then be entered per recipe unit of measure, e.g. cost per Kg, for the selected overhead.

The ingredient cost is based off the cost specified on the RM, or the calculated cost on a WIP product. The ingredient cost will be converted to the cost based off the unit of measure for the ingredient on the recipe.
When a batch is produced the cost for the actual batch will be calculated based off the recipe and the actual amounts consumed.
All cost values will be committed with inventory transactions so that the cost at the time of producing the stock will be held historically.
Processes
Processes allow you to display and collect information on a batch. A process can be viewed from a batch and help or guide operators when producing a batch of product.
To create a new process version perform the following steps:
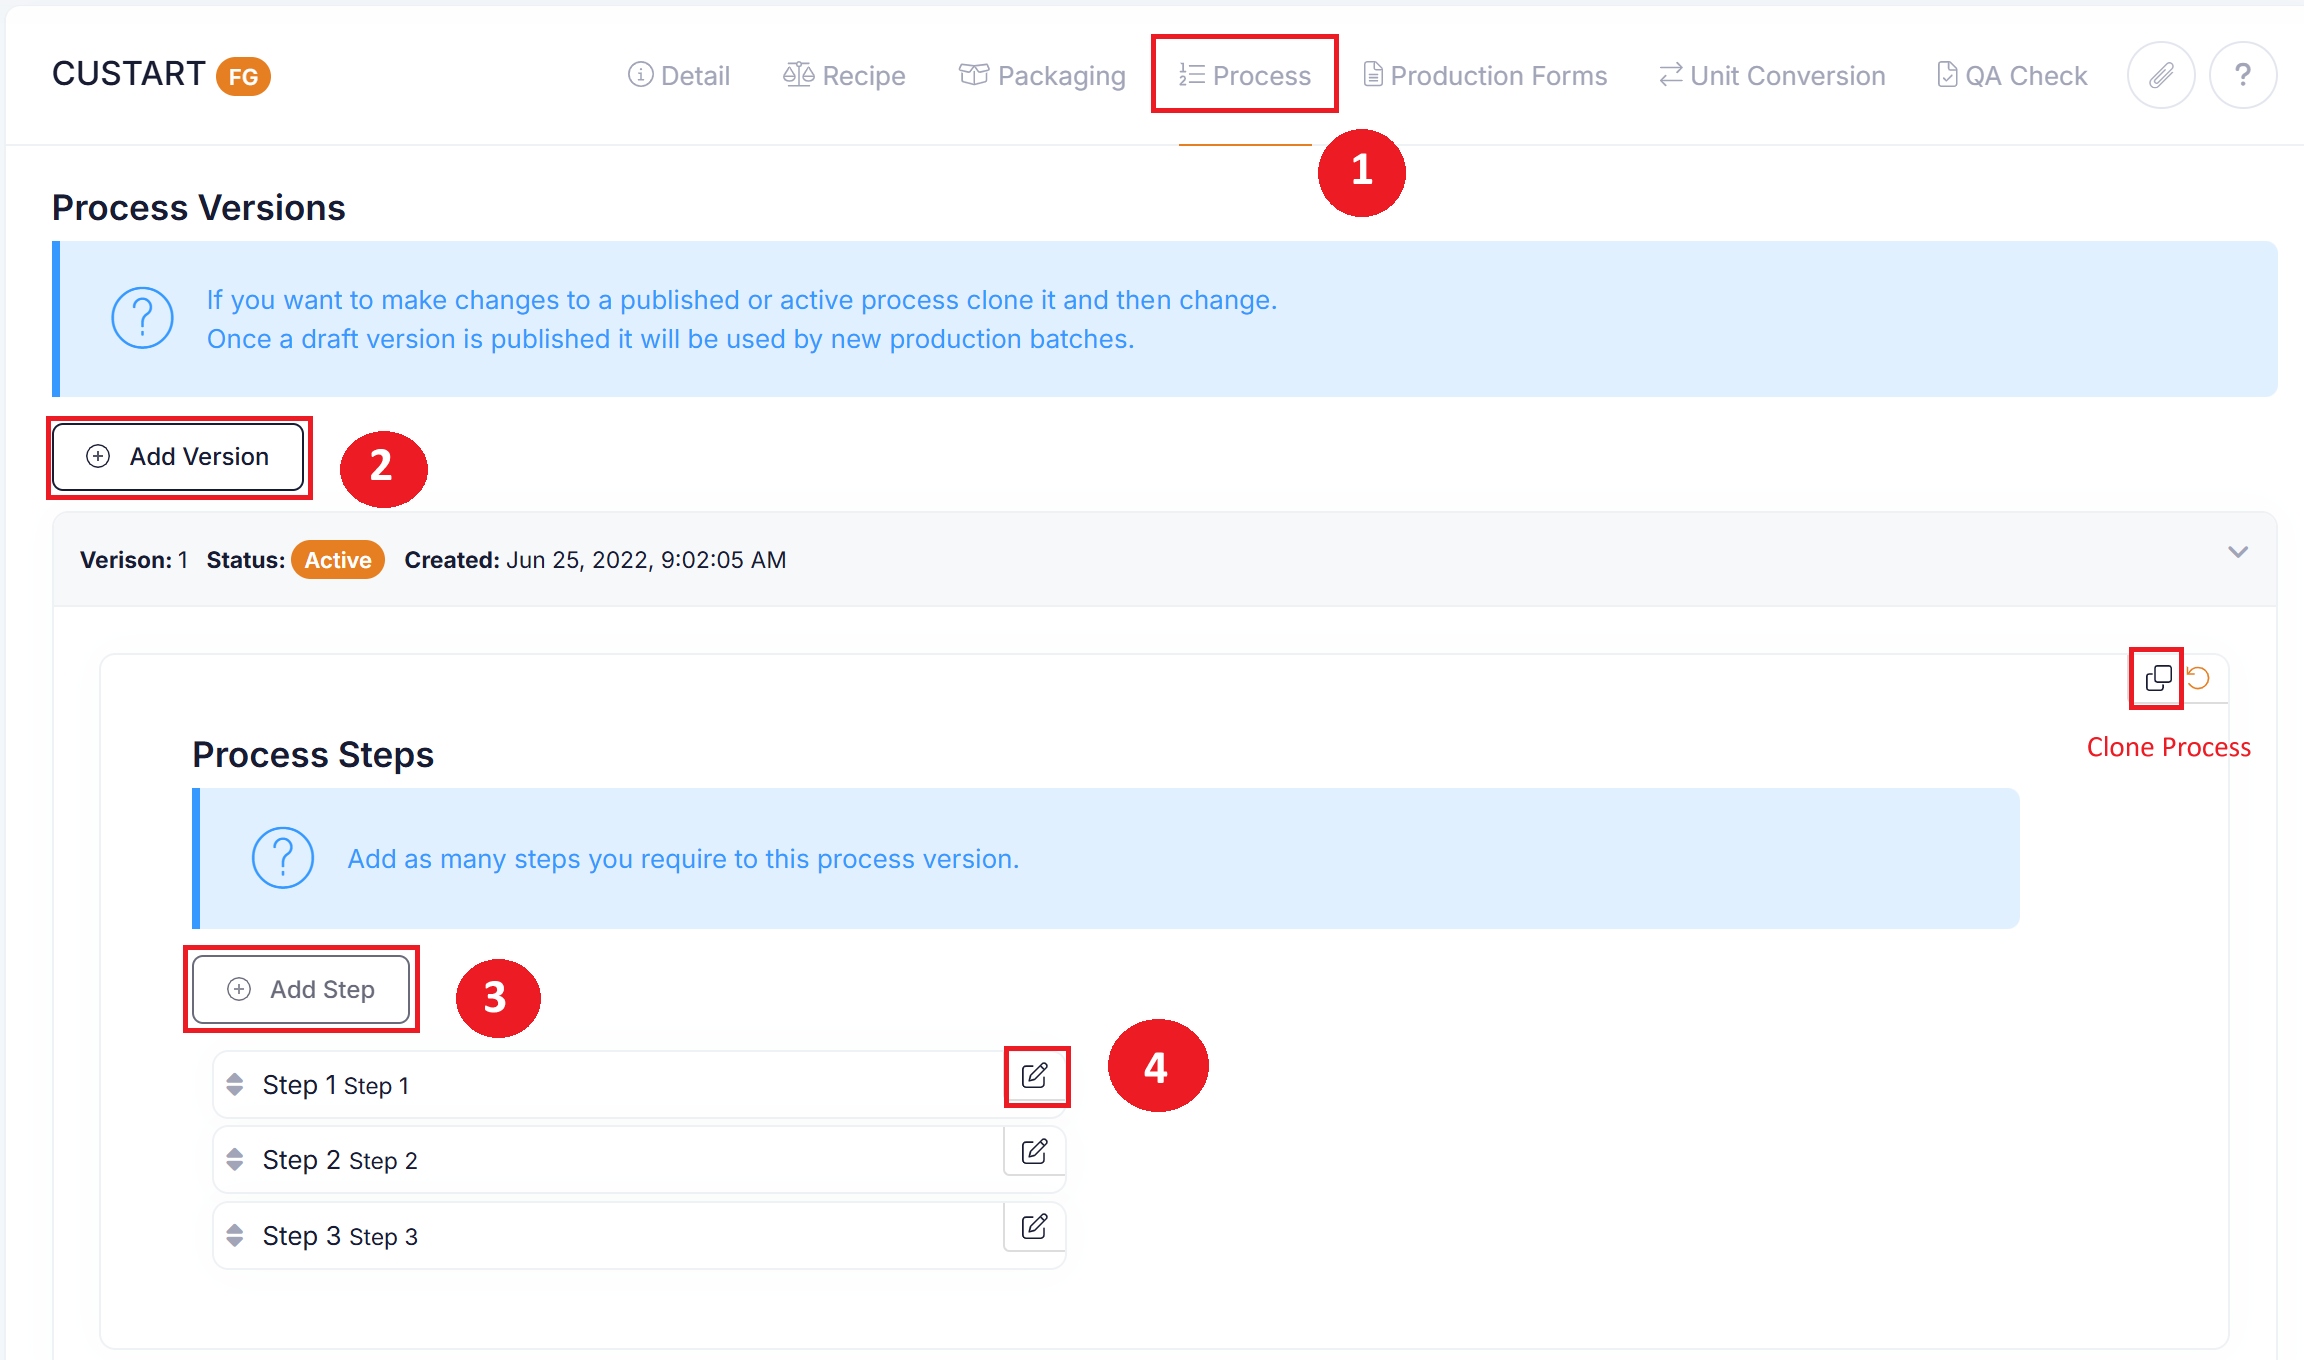
- Go to the Process tab
- Click the Add Version button, a new draft version will be created
- Click on Add Step to add a new step. Once a step is added it can be reordered by dragging and dropping a step either above or below another step.
- Click on Edit to make changes to the step, i.e. add content to the step.
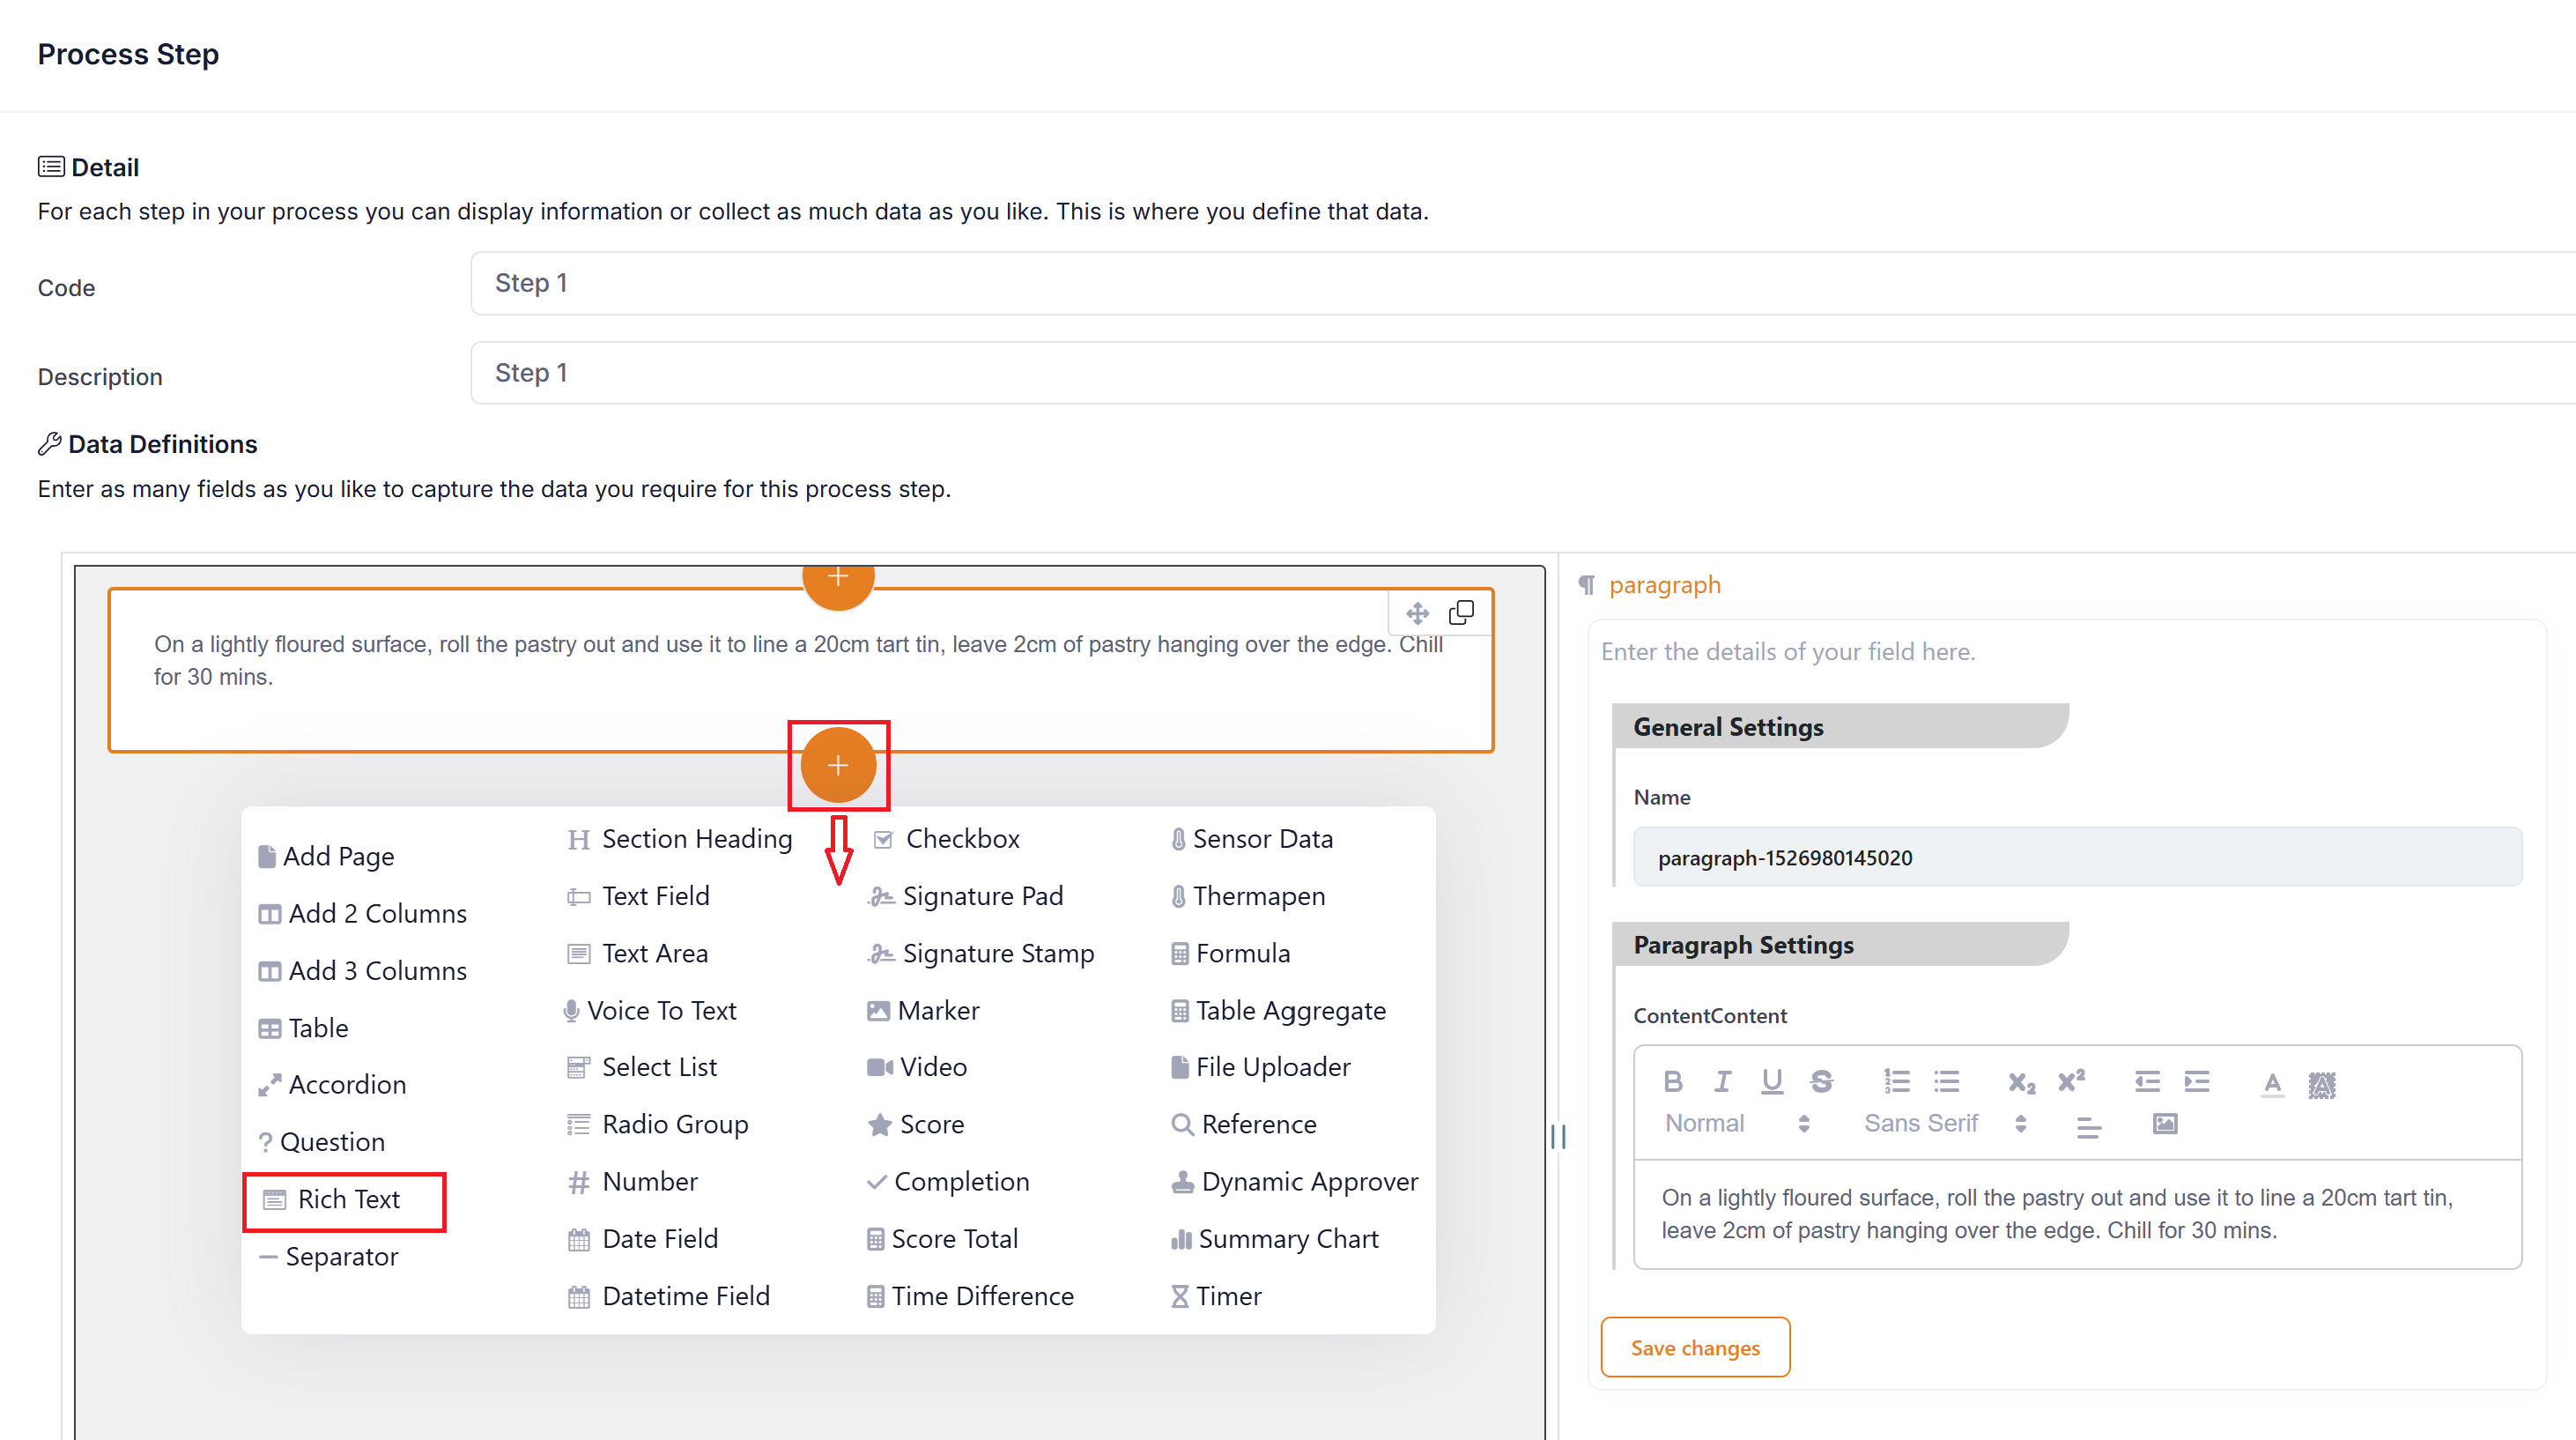
Once in a step you can add content as follows:
- Enter the Code and Description of the step.
- Add content by clicking on the orange + icons. See here for more detail: Form Builder
- Once complete click the Save button at the bottom right of screen.
Packaging
The packaging tab allows you to add all the components of the products packaging against the product. For example the packaging of a product might consist of a lid and a container. These two components can be entered against the product and tracked, if required, against the batch.
If you would like to minimise data entry and some of your packaging can be calculated, i.e. for every container we use one lid, then you can use linked packaging to auto consume the linked packaging. For example you might link a lid to the container, and every time you consume a container on the batch you will automatically consume a lid from stock. Note that the auto consume will consume stock using FIFO.
The packaging also provides us with a reference against the product so that you can convert between the packaging unit of measure and the products unit of measure.
Similar to recipes the packaging is version controlled, and a new version should be created every time the packaging changes.
To create a new packaging version perform the following steps:
- Go to the packaging tab
- Click the Add Version button, a new draft version will be created

- Add the packaging component to the packaging version

- Specify the packaging component product. Note: Only active packaging components can be selected.
- Enter the expected quantity of packaging to be used in batch. Note: This quantity will be multiplied by the recipe multiplier on the batch. To enter quantity the 'Use Product Packaging Quantities' flag must be on in Account Settings.
- Enter the unit of measure of packaging
- Select whether to track this packaging component on the batch. This would require you to receipt packaging into stock from suppliers, and then enter supplier batch details when consuming the packaging during a production batch. If you don't track on the batch then the packaging is primarily used to perform unit of measure conversion.
- If this is a linked packaging component then tick 'Auto Consume' and select the packaging component it is linked to. Enter the 'Quantity Required', the quantity that will be auto consumed for each linked packaging component.
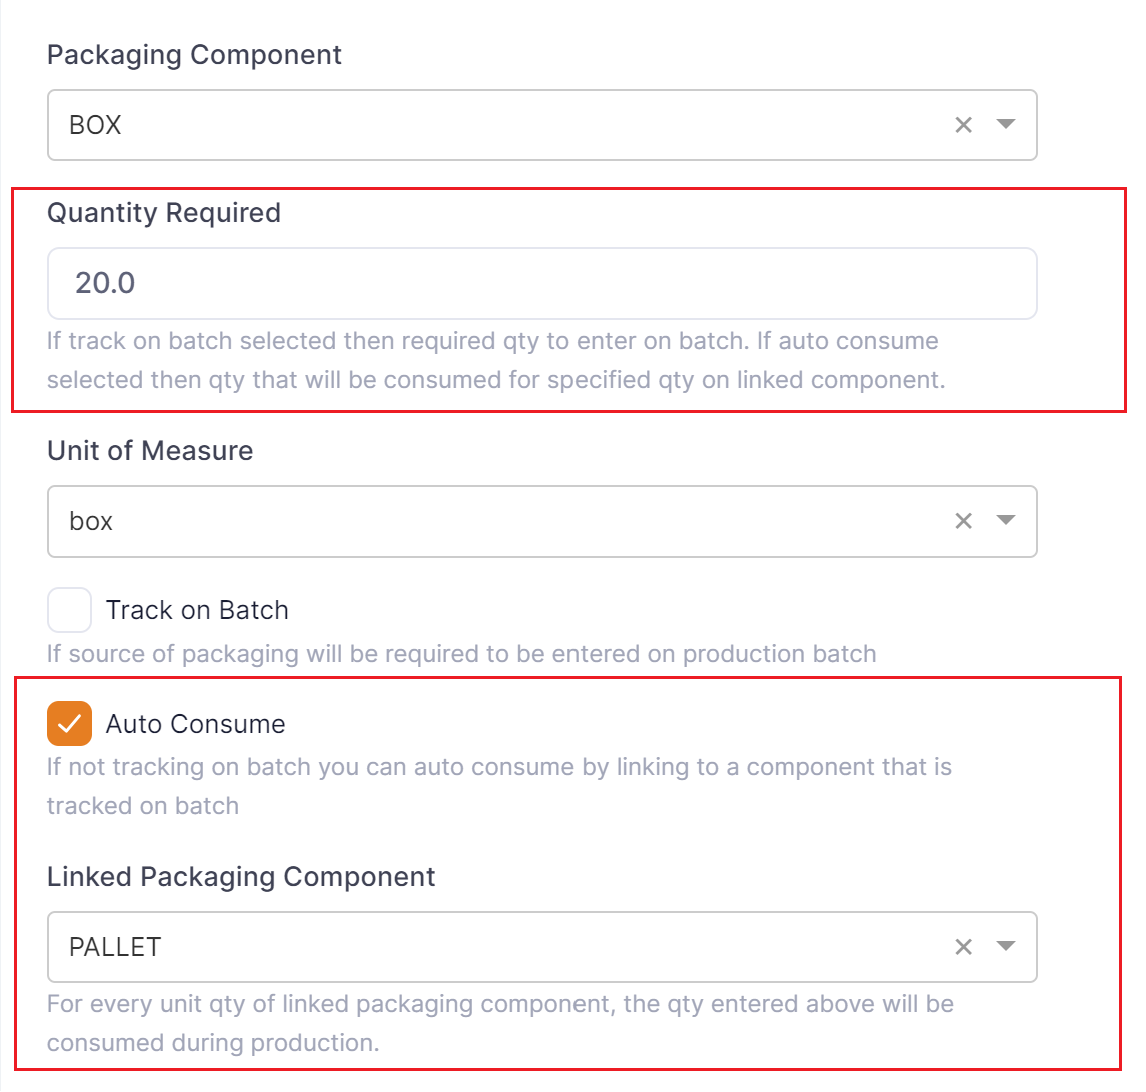
Note: If your auto consumed packaging has a ratio of 1:1 with your linked packaging then you should enter the same qty on the auto consumed packaging as your linked packaging. If your linked packaging has a qty of 50 and your ratio to consume is 1:2 then you should enter 100 as your qty on your auto consumed packaging. This would mean that for every 1 unit consumed on the linked packaging 2 units would be consumed on the auto consumed packaging. - Click Save
- You can edit or delete a packaging component once added by clicking the edit or delete button

- Once all your packaging components have been entered you can publish the packaging version so that it can be used
- If you made a mistake and the version is not published you can delete it by clicking the delete button

- If you have published a packaging version but it has not yet been used you can unpublish it by clicking the unpublish button
- If you want to create a new version based off another version then you can clone the version by pressing the clone button
Product Packaging Quantities To enter a quantity to be used as an expected qty and default during batch packaging entry then you must turn the 'Use Product Packaging Quantities' flag on in Setup --> Account Settings. |
Unit Conversion
| Note: It is best to put general unit conversions on the raw material or packaging component. Only custom Unit conversions for a product should be placed on the product and any conversions required for dispatch. |
Unit of measure conversions allow quantities of the product to be converted from one unit to another. QTRACA will automatically work out what unit of measures are used by the product by looking at:
- ingredient UOMs
- recipe UOM
- product UOM
- packaging UOM's
For standard UOM's QTRACA already knows how to convert. To manually enter other unit conversions perform the following steps:
- Go to the unit conversion tab
- Click the Generate Unit Conversions button. This will generate any required unit conversions that need to be manually entered

- For each generated unit conversion click edit
 , and enter the correct conversion factor. The conversion factor should be entered as a whole number. You can switch the From - To UOM's to help enter the correct conversion factor by clicking the switch button.
- Once the the unit conversion has been updated click the save button
In some cases you may wish to dispatch the product using a different unit of measure to that being stocked. In this case you may add the unit conversion manually.
- Click the 'Add Unit Conversion' button.
- A unit conversion will be created with default unit of measures.
- Edit this newly created unit conversion and change the unit of measures to that required.
- Enter the conversion factor,
- 'Save' the unit conversion.
Tip: You should always try and enter the unit conversion as a whole number. you can do this by using the switch button to the from and to unit of measures if required.
For example if you have 12 bottles in a case you want to enter a conversion that gives 1 case = 12 bottles, having a conversion factor of 12, rather than 1 bottle = 0.08333 cases, having a conversion factor of 0.08333.
Production Forms
You are able to link forms to a production batch. This means when you create a production batch you will be able to click on the associated forms and fill then out specifically for a batch.
To add a form template to a product:
- Click on the production forms tab
- Click on the add form template button
- Select the form template you wish to be linked to a batch of this product.
- If you wish to make sure the form has been confirmed before allowing the batch to be cleared click the 'Require Form to be Confirmed Before Completing Batch' checkbox.
- If you wish to make sure the form has been approved before allowing the batch to be cleared click the 'Require Form to be Approved Before Completing Batch' checkbox.
- Click 'Save'
Note: You only need to tick either 'Require Confirmation' OR 'Require Approval', you should not tick both.