
The NCD WiFi Micro Gateway allows the complete line of NCD sensors to communicate over the internet to AWS using a WiFi connection. The NCD Micro Gateway is very easy to use, as it only requires network connection credentials and AWS security credentials. All sensors are fully encrypted using 128-bit AES encryption. WiFi communications is also fully encrypted for your security. To get started using the WiFi Micro Gateway, follow the steps outlined below.
Gateway Setup
- Contact QTRACA for your unique AWS IAM Credentials. This key and secret must be kept secure and not lost as it will be required for any future gateways you may setup.
- Make sure your NCD AWS IoT Gateway is in setup mode which is indicated by a flashing blue LED. If it is not in setup mode then open the lid, then press and hold the CFG button until the LED begins flashing Blue to enter setup mode.
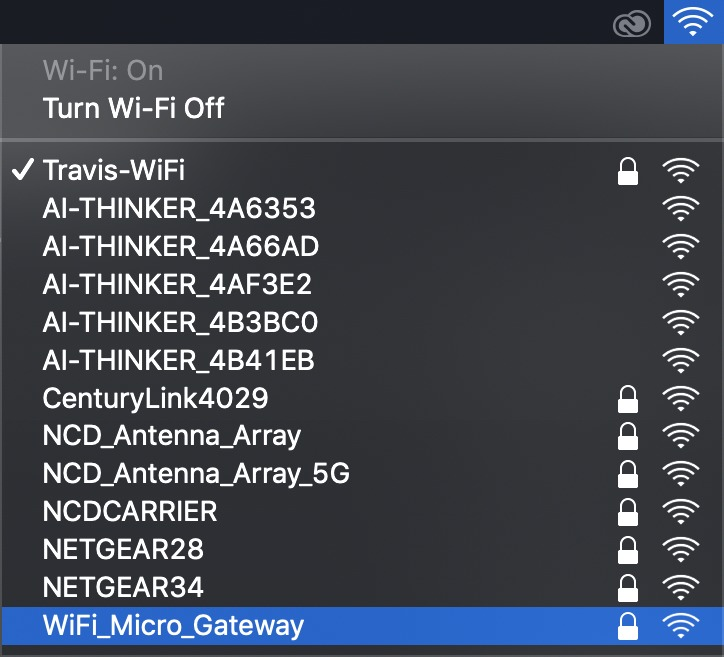
- Once it is in setup mode open the WiFi network preferences on your computer and scan for WiFi networks. The Gateway should show up in the WiFi network scan as WiFi Micro Gateway. Select WiFi_Micro_Gateway. When prompted for a password enter: NCDBeast.
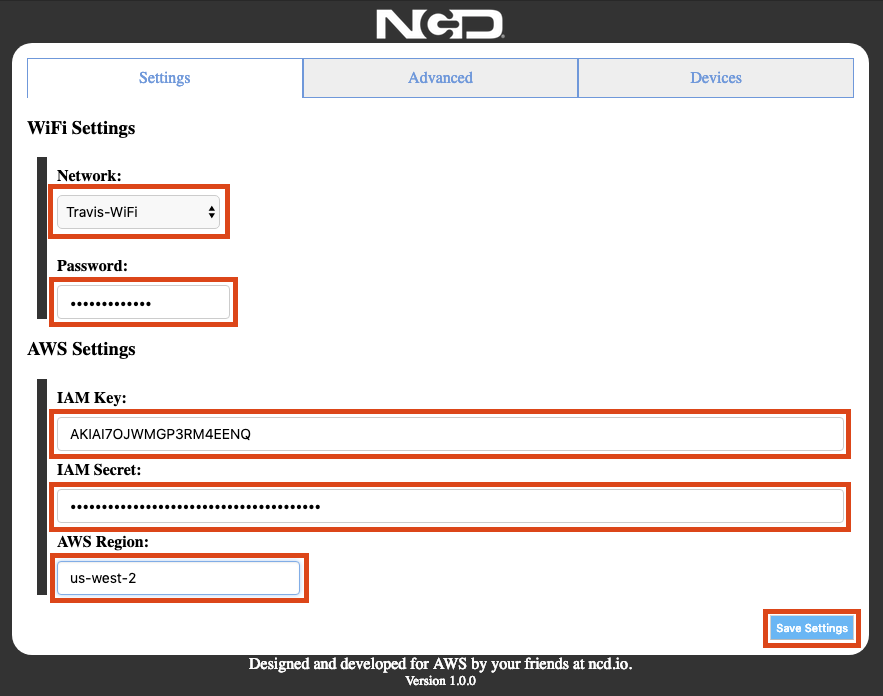
- Once connected to the Gateway a browser window will appear on your screen. If for some reason this browser window does not appear open your browser and enter the IP address 172.217.28.1 then press enter. This browser interface tells the Gateway which WiFi network to connect to for internet access, the network’s password, and the AWS IAM credentials for provisioning itself to AWS IoT and the AWS region (Your AWS region is us-east-1 or US East (N. Virginia) ). Enter this information into the browser interface and click the Save Settings button.
 After saving the settings the Gateway will store the information you entered into memory and will reset. When it powers back up the LED will turn Yellow and flash indicating it is booting. Do not be alarmed if the LED changes to a solid Yellow or turns off as the Gateway is busy communicating with AWS. After a brief time the LED will turn solid Green indicating the gateway has successfully provisioned itself on AWS IoT and has connected to it via MQTT.
Sensor Setup
Now that the Gateway is communicating to AWS, it’s time to power-up your remote sensors. Follow the steps shown below to enable NCD Sensors:
- Remove the NCD Sensor from product packaging and carefully install the antenna. The antenna screws onto the side of the sensor. Please DO NOT OVER-TIGHTEN or damage will result.
- Remove the top lid of your first sensor.
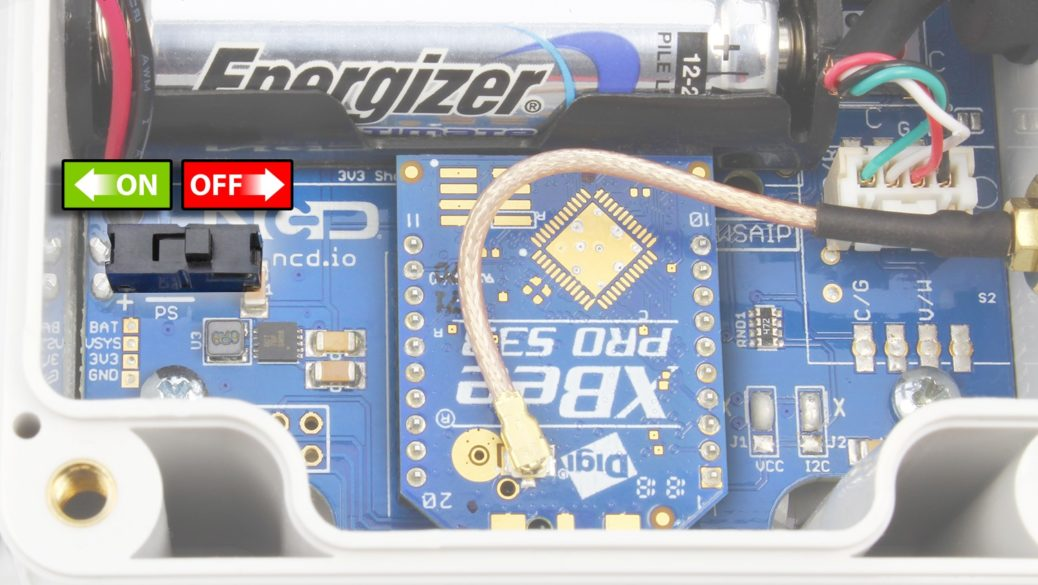
- Move the power switch to the ON position as shown here:
- Re-Install the lid and secure the screws. For best results, install the sensor in a high location, preferably greater than 3 meters from the floor. Make sure the antenna of the sensor is high enough to avoid shelving or other obstacles.
QTRACA Setup
If the serial number is provided on the side or bottom of your sensor then you may skip to step 8. Otherwise start at step 1 to determine the serial number of your sensor.
- Make sure your Gateway is in Setup Mode. This is indicated by a flashing Blue LED on the Gateway. If it is not in setup mode then open the lid, then press and hold the CFG button until the LED begins flashing Blue to enter setup mode.
- On your computer search for WiFi Networks. The Gateway should show up in discovered networks as WiFi Micro Gateway. Select WiFi_Micro_Gateway. When prompted for a password enter: NCDBeast.
- On some operating systems a web interface will be displayed automatically as soon as you establish connection with the Gateway’s WiFi Network. If your computer does not automatically open a web interface open your browser and enter 172.217.28.1 in the URL bar. Note that we only recommend Google Chrome, Firefox, or Safari. There are known compatibility issues with Microsoft Edge and Internet Explorer browsers.
- Once connected to the Gateway’s web interface click on the Devices Tab at the top of the window. Here you can see a list of devices the Gateway has seen since boot up. Do not be alarmed if no devices appear.
- To force the sensor to appear in this Devices view press and then release the reset button on your sensor. This will cause it to send a transmission. This will make it appear in the Devices View. An example of a device is shown in the image below.
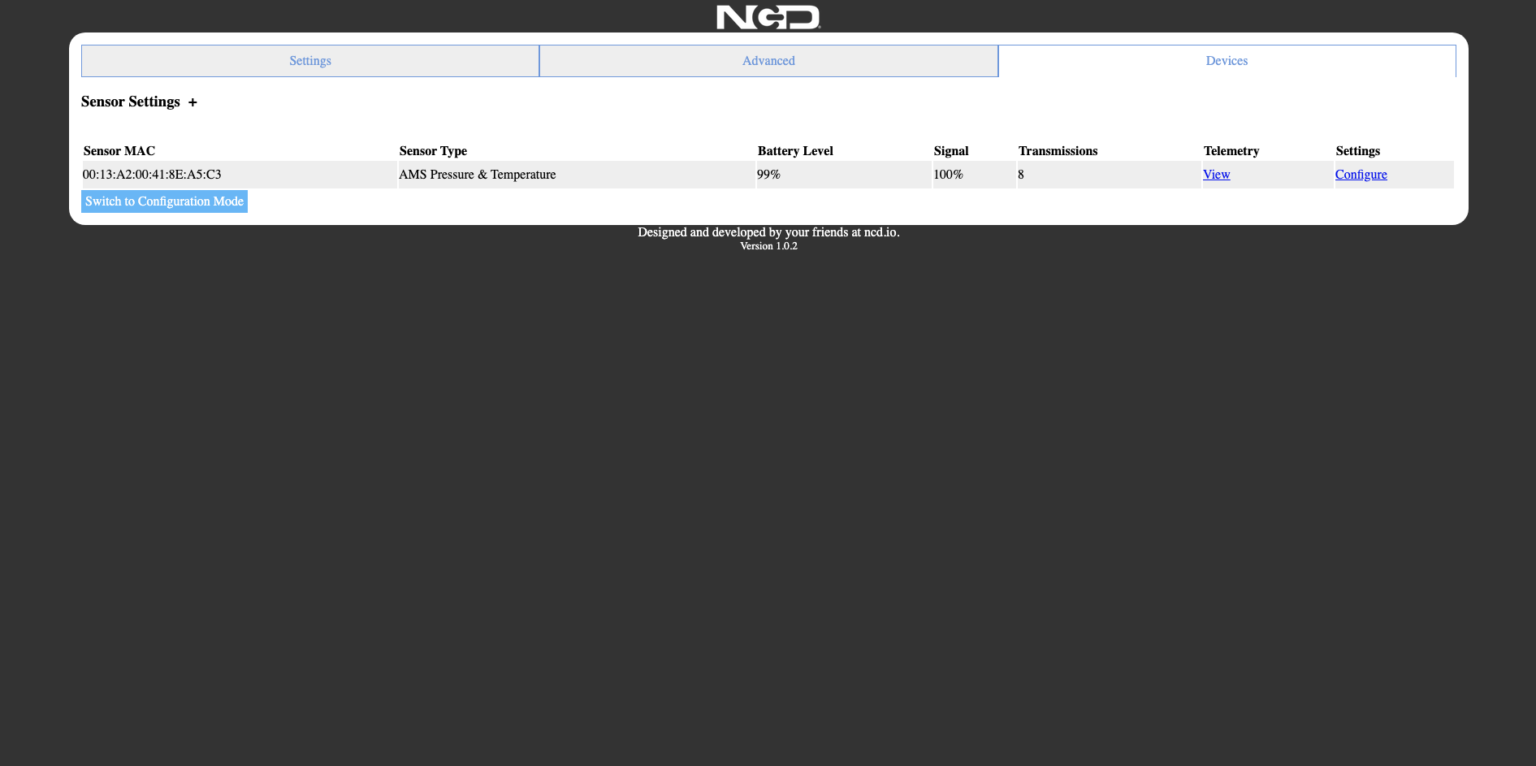
- Copy the Sensor MAC. This is the sensor serial number required for QTRACA.
- Transform the sensor MAC into a serial number by removing the colons (:) and adding SN to the front. For example: Sensor MAC: 00:13:A2:00:41:A1:C2:07 --> Serial Number: SN0013A20041A1C207
- In QTRACA, go to 'Remote Devices' and add a new IoT Device.
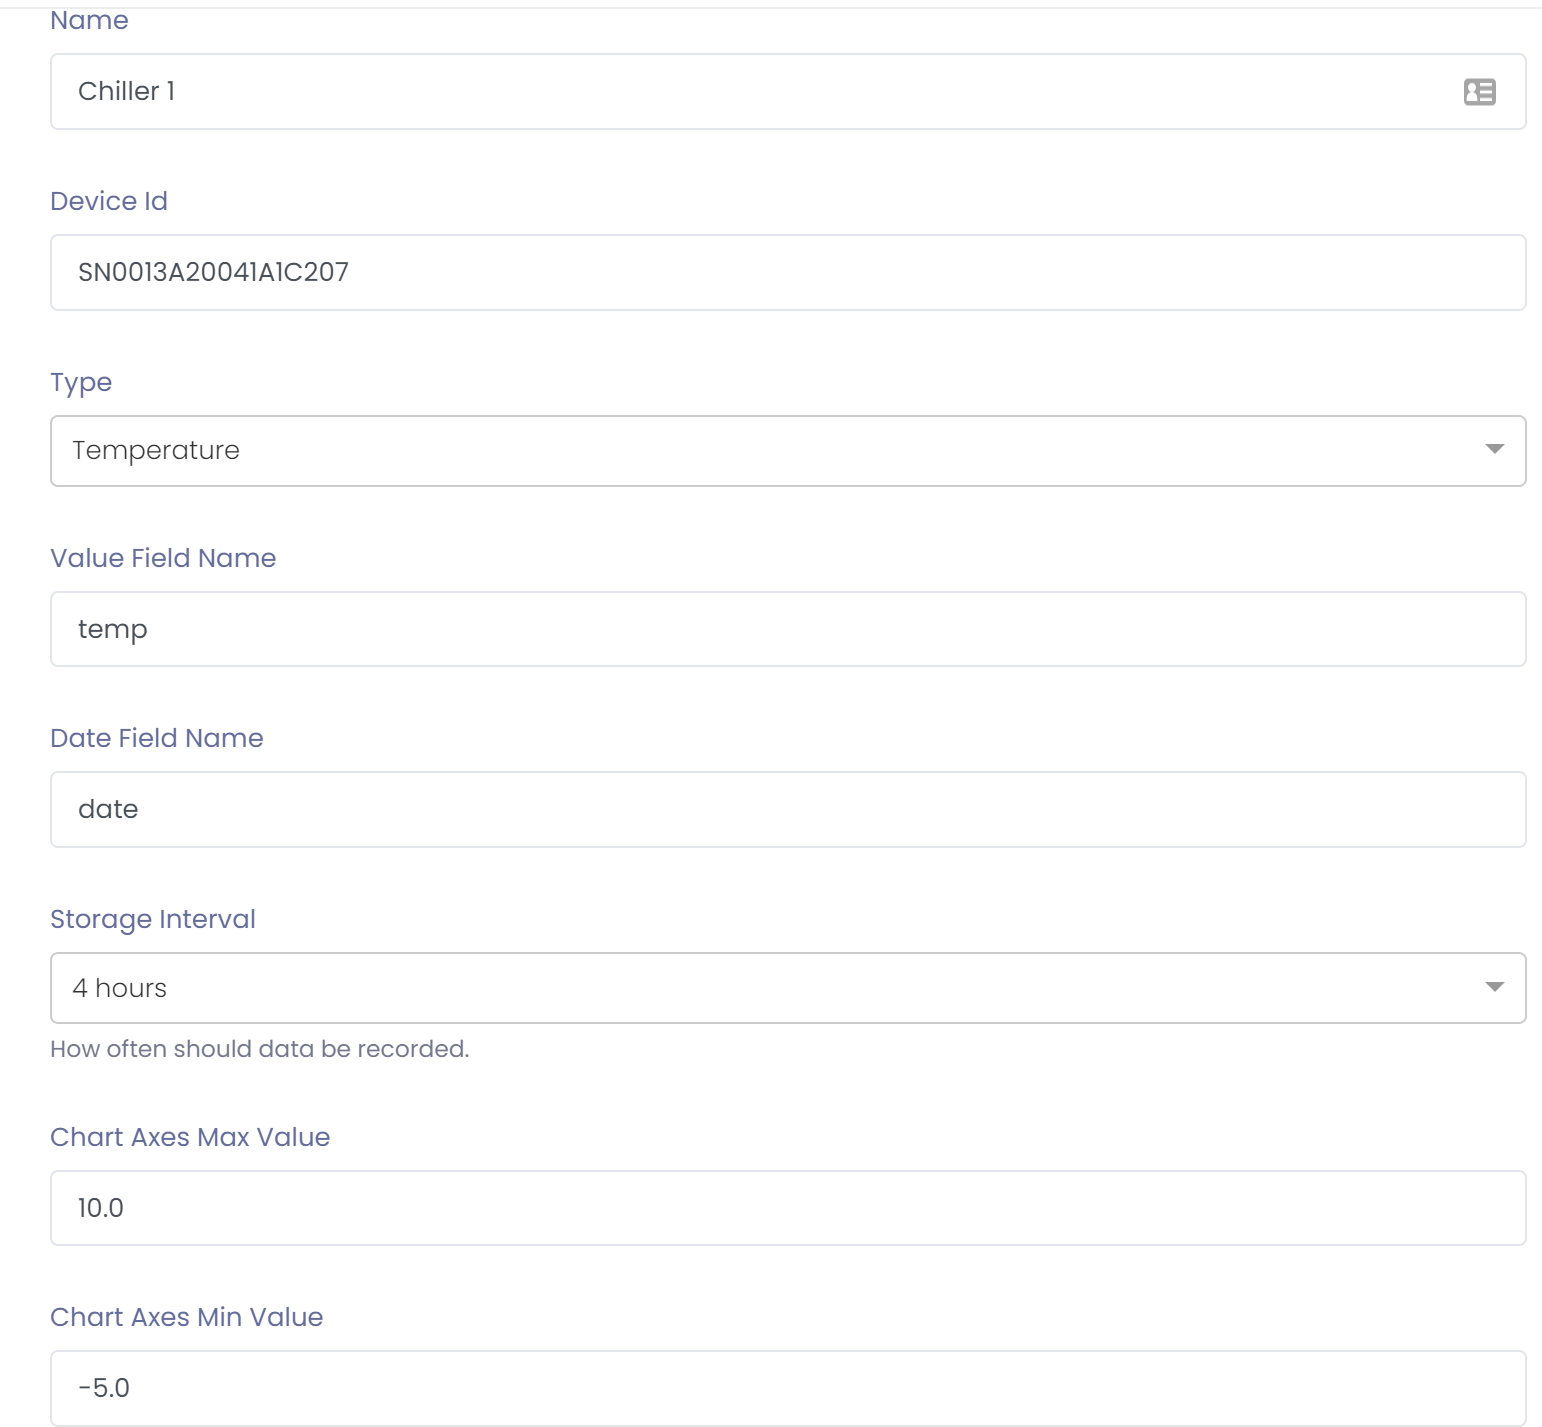
- Enter the following for the new device, and then save the record
- Name to identify sensor
- Serial number of device
- Select 'Temperature' as the type
- Enter 'temp' in the value field name
- Enter 'date' in the date field name
- Enter the time frequency to save data from sensor. This should be set a frequency required by your food control plan.
- Enter the max and min temperature value for chart axes.
Your sensor is now ready and will start recording data.